Difference between revisions of "Koha:Cataloging"
JStallings (talk | contribs) |
JStallings (talk | contribs) |
||
| Line 35: | Line 35: | ||
<code>005</code> Click field to update to current time | <code>005</code> Click field to update to current time | ||
<code>020</code> Double-check ISBN. Koha pulls covers from Amazon based on this. (Don't include hyphens.) | |||
<code>040 $d</code> Click [[File:Koha-clone-subfield.png|frameless|middle]] to create additional $d, then enter <code>TSAS</code> | <code>040 $d</code> Click [[File:Koha-clone-subfield.png|frameless|middle]] to create additional $d, then enter <code>TSAS</code> | ||
Revision as of 06:47, 31 August 2016
When a library patron searches for a book about turtles or the works of Shakespeare, he or she is asking the library's database to comb through the records for its holdings and return those with matching values. These records are written in MARC format, which stands for MAchine-Readable Cataloging. Cataloging (which you are about to do) is the act of creating records within a bibliographic database that represent items within a library's collection.
To begin, log into the TSAS Koha staff client with your credentials. Select More-->Cataloging.
Z39.50
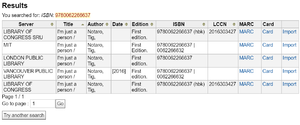
After searching (and not finding the record in our catalog), click "New from Z39.50/SRU." Z39.50 is an information retrieval protocol that allows institutions to share MARC records for copy-cataloging purposes. It saves us time and we like it very much.
After clicking "New from Z39.50/SRU," a window will popup with a list of search targets. If you are using a barcode scanner, click the ISBN box and scan the barcode. If you are typing it in, do not include the hyphens (e.g. 9780062266637). Hit Enter. If you're lucky, a few results will pop up.
We want records that closely match our standards so we don't have to make many changes in the next steps. Click "Card" next to the top entry. You are looking for a synopsis and robust, accurate subject headings. (What are "robust and accurate" is up to you—I trust your judgement or you wouldn't have admin rights!) Look through all of the entries before choosing.
Check MARC Records
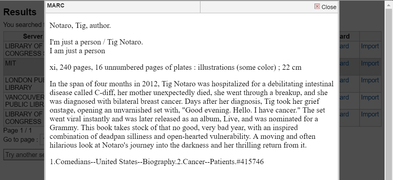
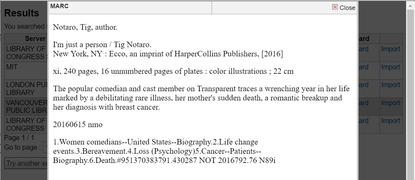
Once you have chosen one or two that are suitable, click on the MARC link. (The records are confusing at first, but once you get the hang of it you'll have real librarian cred.) If only one was acceptable in the last step, you can skip this one.
Check each MARC record against the following list. The fields decrease in importance, so once one record doesn't match, you can remove it from your list. Once you have only one record, move to the next step.
082 04 _a Must have Dewey number (e.g. 792.430287)
040 _e "rda" preferred
050 LCC number is preferred
Edit MARC Records
Once you have narrowed your list to one record, press "Import" to pull the record into our Koha database. You should see a screen that looks like the image to the right.
The following list describes the changes to be made to each field and subfield. If a field is unclear, click the question mark next to the field number (000, 008, etc.) to go to the Library of Congress's MARC 21 explanation page for that field.
003 Click field to update to TSAS
005 Click field to update to current time
020 Double-check ISBN. Koha pulls covers from Amazon based on this. (Don't include hyphens.)
040 $d Click ![]() to create additional $d, then enter
to create additional $d, then enter TSAS
049 Clear and leave blank
082 04 $a Dewey number only. (E.g. 791.430287 NOT 2016 becomes 791.430287. If there are no spacers (the slash in 468.2/421), search
082 04 $b Cutter number. Use the Cutter program on the desktop to create a 4-digit code representing the author's last name.
092 Clear and leave blank
Click the 1 tab at the top to move to the next section.
100 1# $a Click ![]() to search for an authority much like you searched for the biblio record. You may need to close and reopen the authority search results screen when creating a new authority. This needs to be expanded
to search for an authority much like you searched for the biblio record. You may need to close and reopen the authority search results screen when creating a new authority. This needs to be expanded
245 10 $a First word of title that is not an article (A, An, The, etc.) should be capitalized. Second indicator represents number of characters to skip at the beginning of the title. The War of the worlds is alphabetized under W, so the second indicator should be 4 (three letters and a space). For more, see LoC website[1]
260 ## $a City, state followed by a space and colon: New York : or Big Spring, Tex. :
260 ## $c Date followed by a period: 2015.
3xx–5xx Look over, but shouldn't need changing
600 10 $a Lookup name you entered in 100 using ![]()
7xx–8xx Look over, but shouldn't need changing
942 $c Choose from dropdown
See Stallings if anything looks out of place, and please edit the above if you see a pattern I've missed.
Finally, hit Save.
Add Items
The above added the record for the work, now you need to tell the system about the items we have in the library. Think about class sets: we have 25–30 items (copies of a book) with the same record (title, author, etc.).
Fill in the following to add an item:
0 Leave blank
2 Choose "Dewey Decimal Classification" for now...
3 Leave blank
4 Leave blank
5 Leave blank; has no effect on circulation[2]
7 Leave blank unless told otherwise (some reference materials and teacher handbooks will not be circulated, but should show in the OPAC)[3]
8 Main division is "Fiction" and "Nonfiction," but class sets should be assigned to the relevant department. Reference materials include dictionaries, atlases, and other materials rendered obsolete by Google.
a & b "TSAS Library"
c Leave blank, unless we create a special section for new materials. "Senior's choice" would be a cool addition.
d Click for current date, unless paid for by the school. In that case use the date it arrived.
e "Donation" or "Amazon," etc.
f Blank
g Price as printed on jacket
h Blank for now...
i Blank
j Blank; the only option is true/false[4]
o Should be pre-filled. If not, click MARC and edit 082 04 $a. Press space and add Cutter number, space again and add year. Like: 398.2 B911 1999
p Click to fill
t Blank for now (until it becomes troublesome—the barcode should suffice
u Blank
v $g rounded to the nearest quarter dollar
w $d
x Blank
y Match item
z Blank
Woo! You did it! Press "Add item" to add one item. "Add multiple items" allows you to add more than one, and assigns them each a barcode.


